Telebyte 65A RS232 Converter
SHARE |
|
 Telebyte 65A RS232 Converter
 |
by Bill Degnan - 03/25/2015 23:39 |
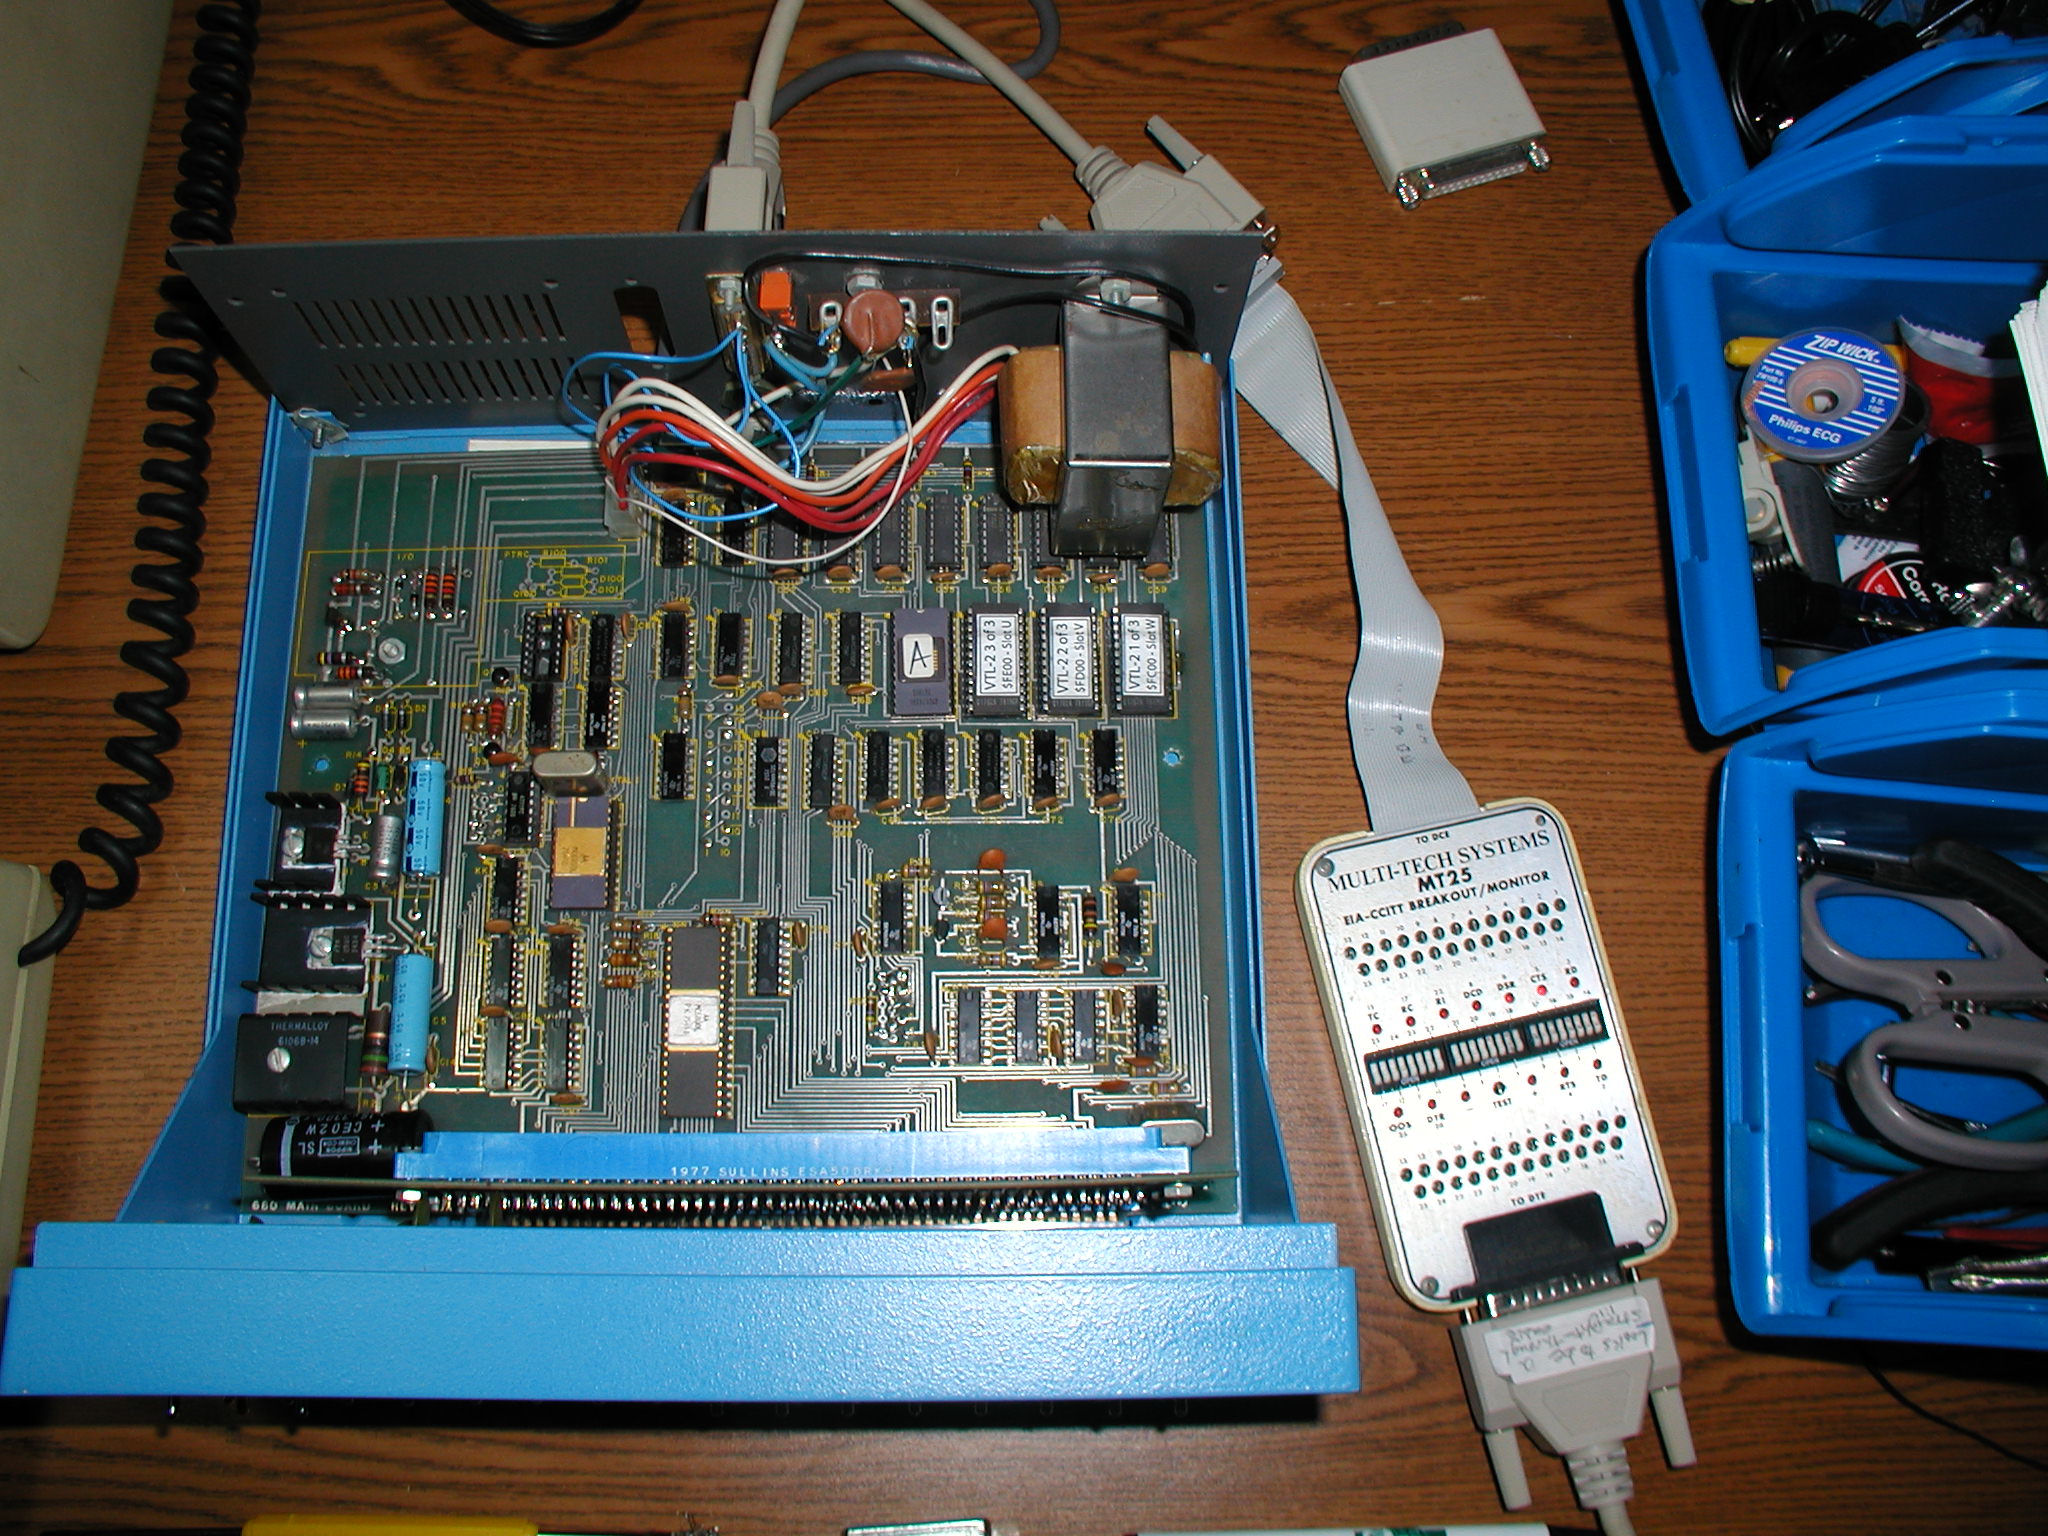 I modified my Altair 680 for 110b, no Baudout, 1 stop bit (see notes about stop bits below). I tested my work by connecting the Altair to a DEC VT102 terminal. Comms are slow but they work enough to get to the ROM monitor prompt and enter commands. Now I know the system works well enough at 110 baud to continue. Note in the photo next to the Altair is a Multi-Tech Systems MT25 EIA-CCITT Breakout / Monitor tester. This device allows me to see what signals are being sent through the serial cable. Click image for larger view.
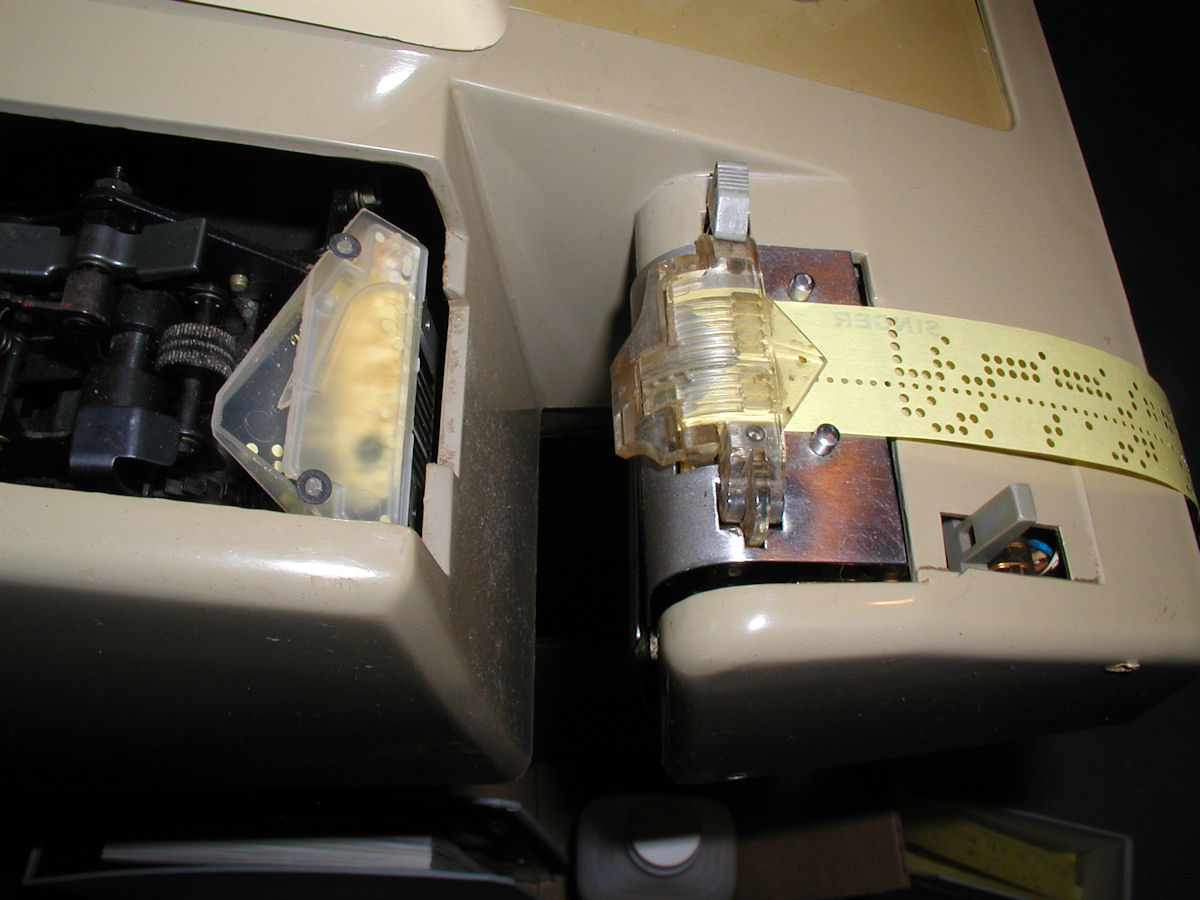
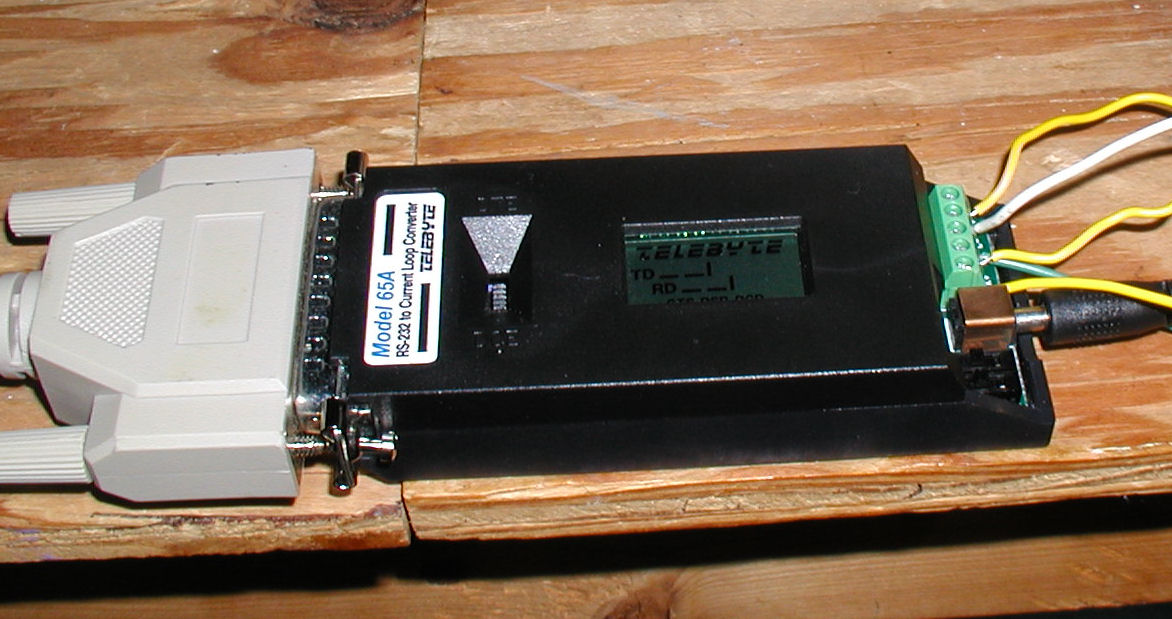 Telebyte Model 65A RS232 to Current Loop Converter. This is what converts RS232 signals to current loop signals. To the left is the cable coming from the computer. To the right are wires that attach to the terminal strip of the teletype (see below). Click image for larger view.
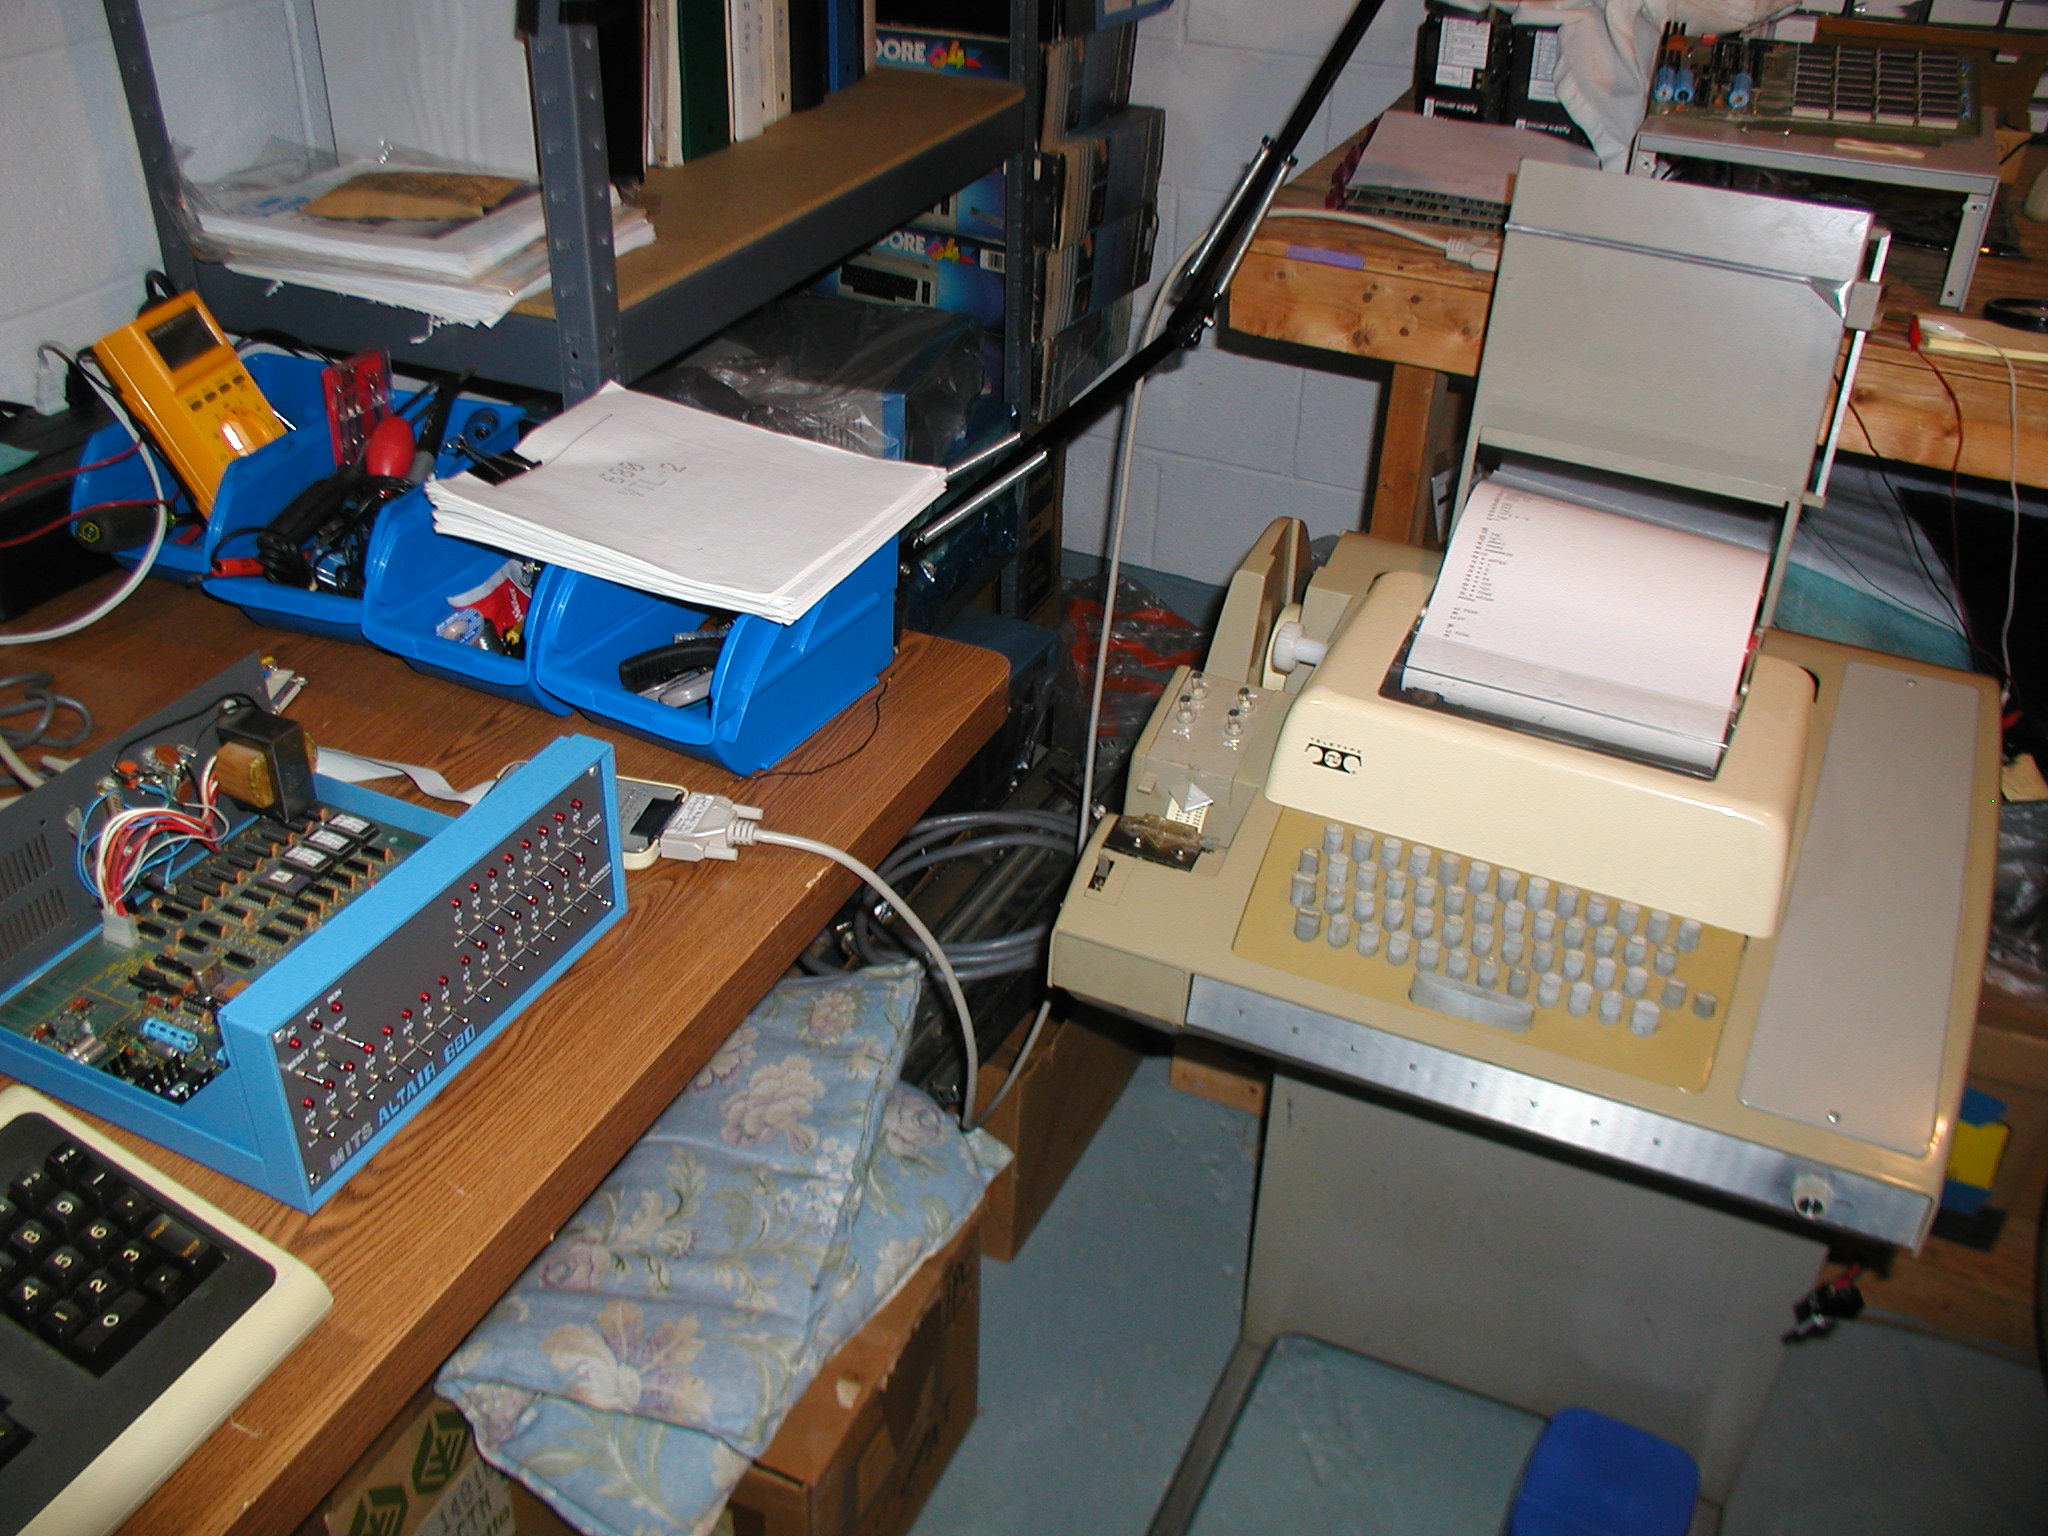 Pictured is an Altair 680 with Teletype as I/O and program storage.
How to attach a teletype to a serial port using the Telebyte 65A: 1. Connect serial straight-through cable to computer serial port and on other end to the RS232 end of the 65A. 2. Set DTE/DCE to DTE 3. Set SW2, SW3, SW4 to 1-2 4. See photo above, the wires coming from the 65A current loop posts are connected directly to the Teletype's terminal strip. Wiring as follows: 65A post K- to Teletype terminal strip 7 65A post K+ (not needed) 65A post G to wires attached to terminal strip pins 6 and 4 65A post C- to terminal strip pin 3 65A post C+ (not needed) 5. Once wiring complete turn on the 65A, and then turn on teletype. If everything is working correctly you'll get a ready TTY in LINE mode. If the teletype is chattering then you did something wrong or the teletype is not working correctly. 6. Turn on your favorite machine set to 7 bits / mark parity / 2 stop bits for keyboard and ASCII tape interaction. It may work just fine with 1 stop bit. Experiment. 7. If you want to send a binary tape sometimes you have to change the computer to 8 bits 2 stop bits no parity just before you send the tape. Next: I may change my Altair to 2 stop bits, but with 1 stop bit it's working perfectly now - I will run more tests to see which works best specifically for the Altair 680. One way to test is to send a program from a modern PC to the tape punch and then try to load the actual papertape I created. Reply |
|
 1 stop bit or two?
 |
by Bill Degnan - 03/28/2015 11:30 |
Question I posed to the Yahoo Alair group:
Hi all, Reply |
|
|
Papertape Created, Loaded, BASIC! |
by Bill Degnan - 03/30/2015 21:28 |
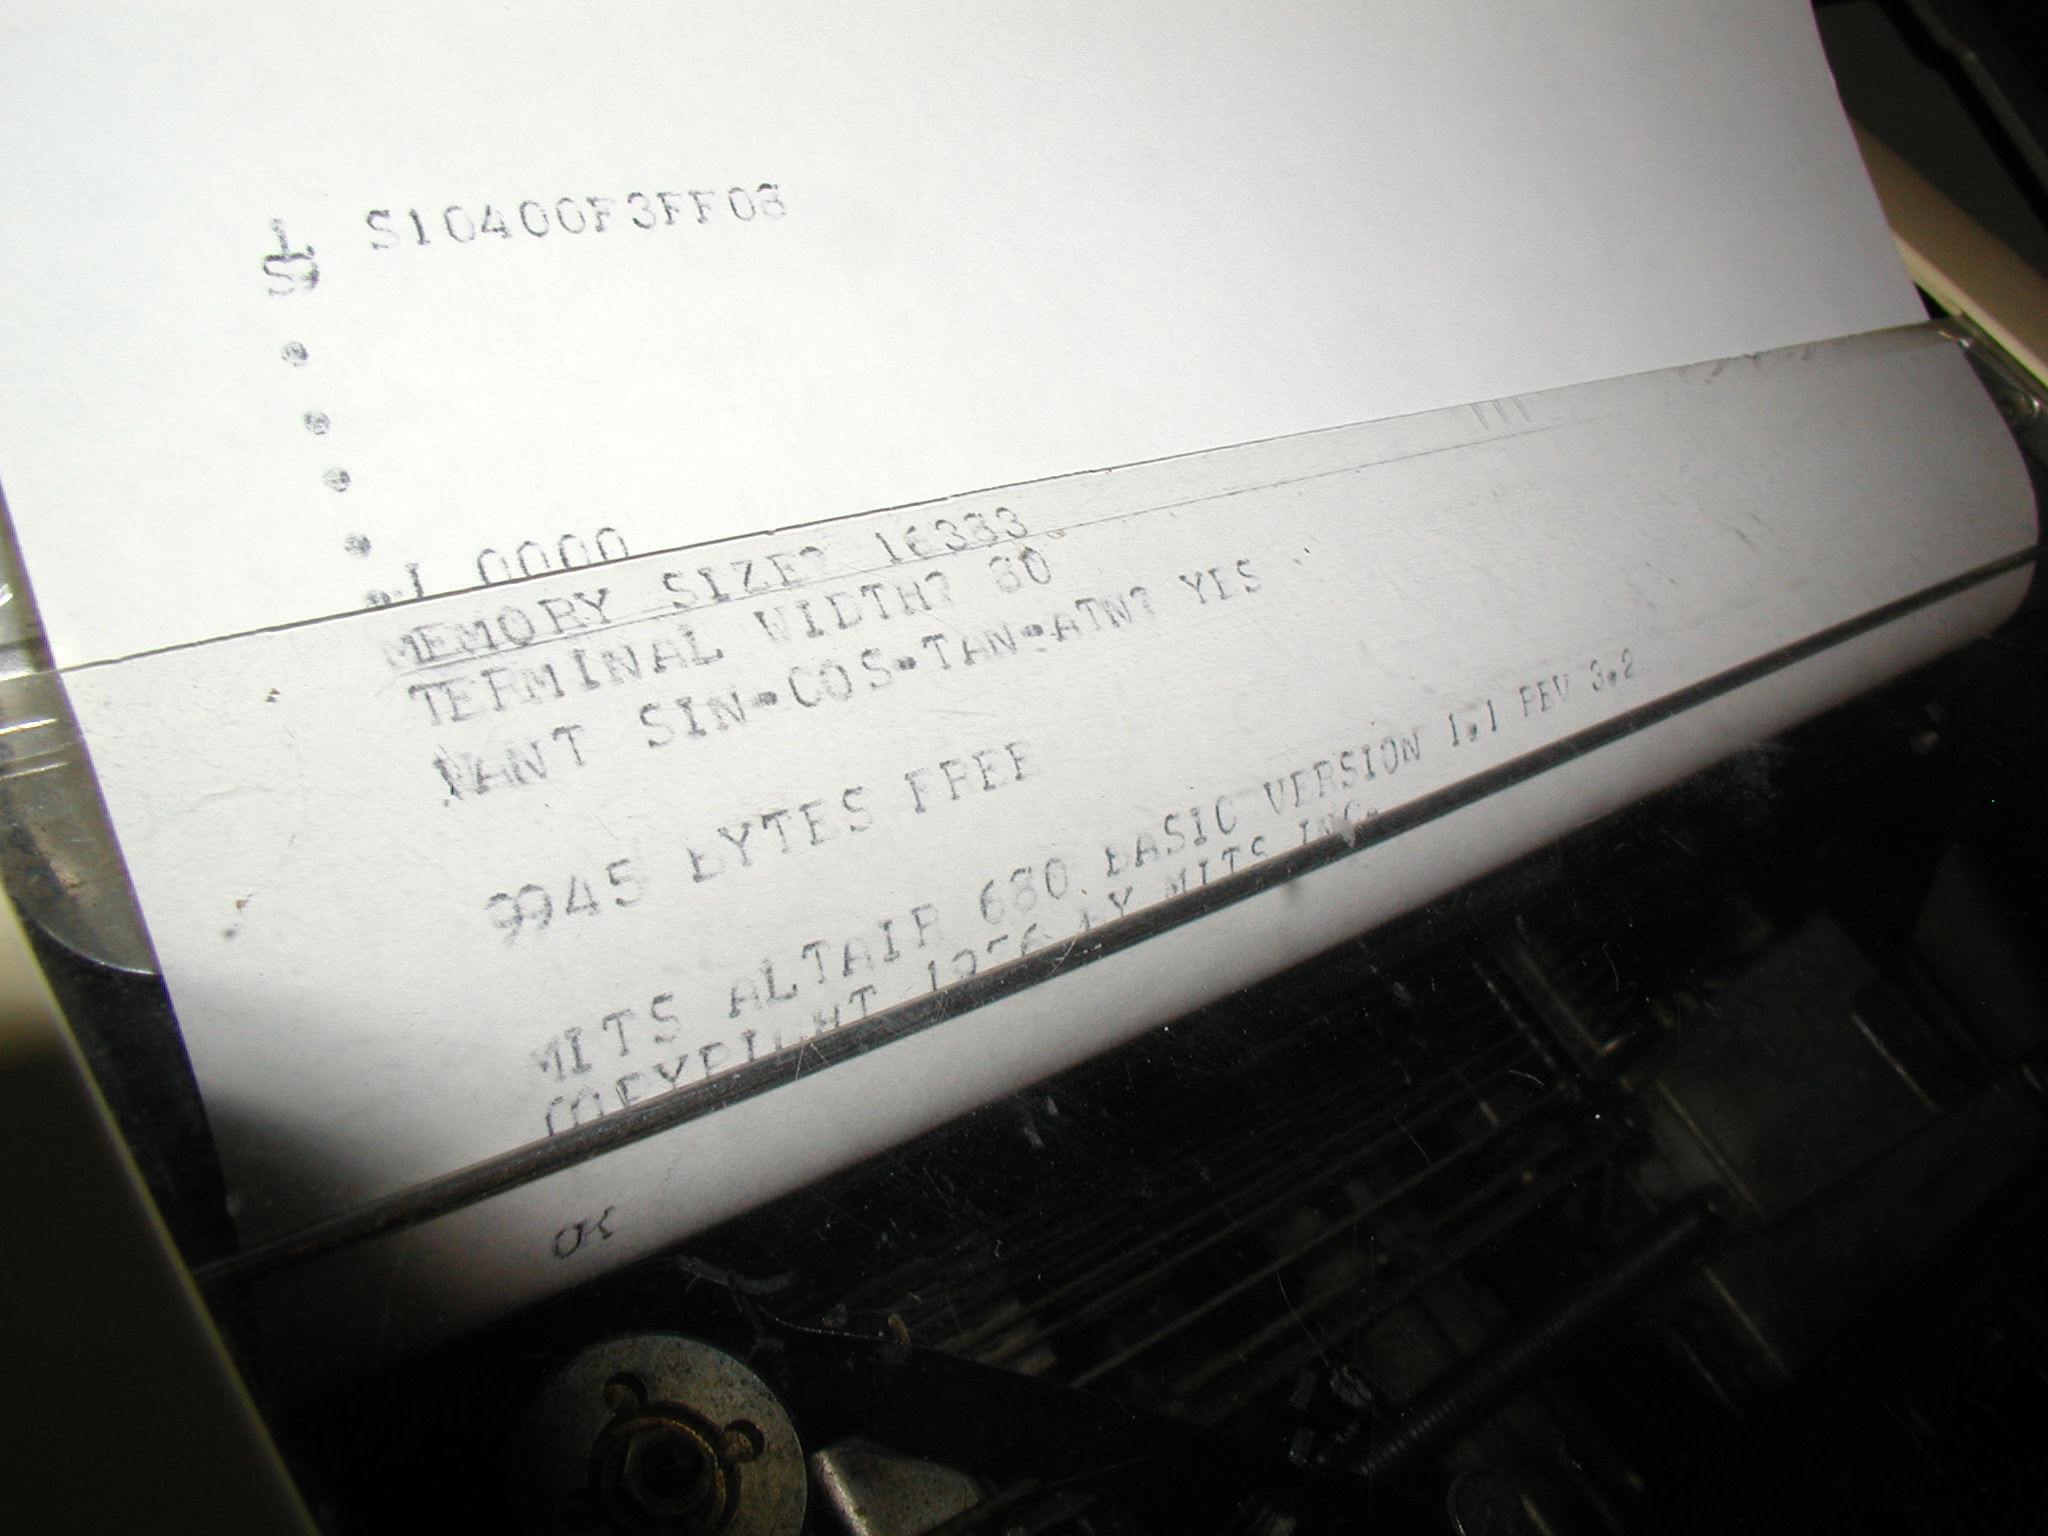 The printout from my Teletype of MITS Altair 680 BASIC initialization. Click image for larger view.
So, long story short I was able to punch a BASIC tape and load it onto my Altair 680 using the Teletype. Not easy. I had to complete a number of small tasks. First I updated my 680's motherboard to 2 stop bits per consensus of the Altair group and the manual. I also changed the starting location of internal RAM to location 4000H. I set my 16K RAM board to use the first 16K. End result - 17K of usable RAM. I replaced two failed TTL chips on the 16K board in order to make it functional, and I will probably have to replace the caps as well. I noticed that RAM in 2000H page was less reliable. More on that in a related thread. I set the terminal program (Windows 3.1 Terminal) communication settings to 110 baud, N / 8 / 2. In the terminal preferences section I chose TTY as the type. I set the screen echo on. Now I could type at the PC and the output would go to the teletype. Punching Tapes: In terminal settings I turned on screen echo, and I added a 2/10 delay per character to slow down the transmission and make sure every bit was transmitted correctly. Yes this slowed things down a great deal, but three or four attempts prior failed due to bad characters being punched. That's a good 30 minutes per try. If the chars are bad, then the BASIC won't load. I can wait an extra half hour to get a 100% accurate tape. When I sent the ASCII papertape file of BASIC I unchecked "strip LF" so that both that and "append CR" were left un-checked. I tried to send a binary tape but the teletype would not respond so I gave that up for now.  Even with a good tape I had a lot of problems getting through the entire tape without the Altair bombing out. Assuming I had a good tape, I turned my attention to the Teletype and very carefully cleaned and oiled the reader. I also aligned the papertape reader to be flush with the back of the reader holder. The 5 screws pictured above are used to make adjustments to the position of the reader. This is important! The tape will not read in correctly if the tape is not fed in perfectly straight. I suggest you set the tape in a position to feed with minimal pull, and if need be carefully feed the tape to minimize the work the reader has to do.
 Don't worry if it's not flush to the front, just make sure the tape reader is aligned to the back as the tape feeds in. Pictured above is "almost right". I brought the reader down a hair after this picture was taken. Click image for larger view.
I made a mountain of papertape before I finally got a good tape. I then had to wait through about 5 reads before I got the reader aligned correctly on both of my Teletypes. End result - I can read in a pretty long MITS Altair BASIC using my teletype, and I can punch a tape using the Telebyte 65A. More photos I filmed the tape loading, etc. I plan to pare it down and upload a video to youtube.com Reply |
|
|
YouTube.com Video papertape BASIC |
by Bill Degnan - 03/31/2015 12:01 |
|
Experience the sights and sounds of loading MITS Altair 680 BASIC from papertape. In 1976 the Altair 680 was designed to be run with an ASR 33 Teletype - which covered all of the I/O for the computer (other than front panel). With the Teletype one could save to papertape, load programs from papertape, type commands into the typewriter and view "screen" output to the printer. It takes about 35 minutes to load version 1.1 rev 3.2. MITS BASIC was written by Microsoft for the Altair 8800 and then ported to 6800 format for the 680b model.
http://www.youtube.com/watch?v=JYU3IFhsfYY Reply |
|
|
Using an Oscillioscope |
by Bill Degnan - 04/26/2015 08:16 |
|
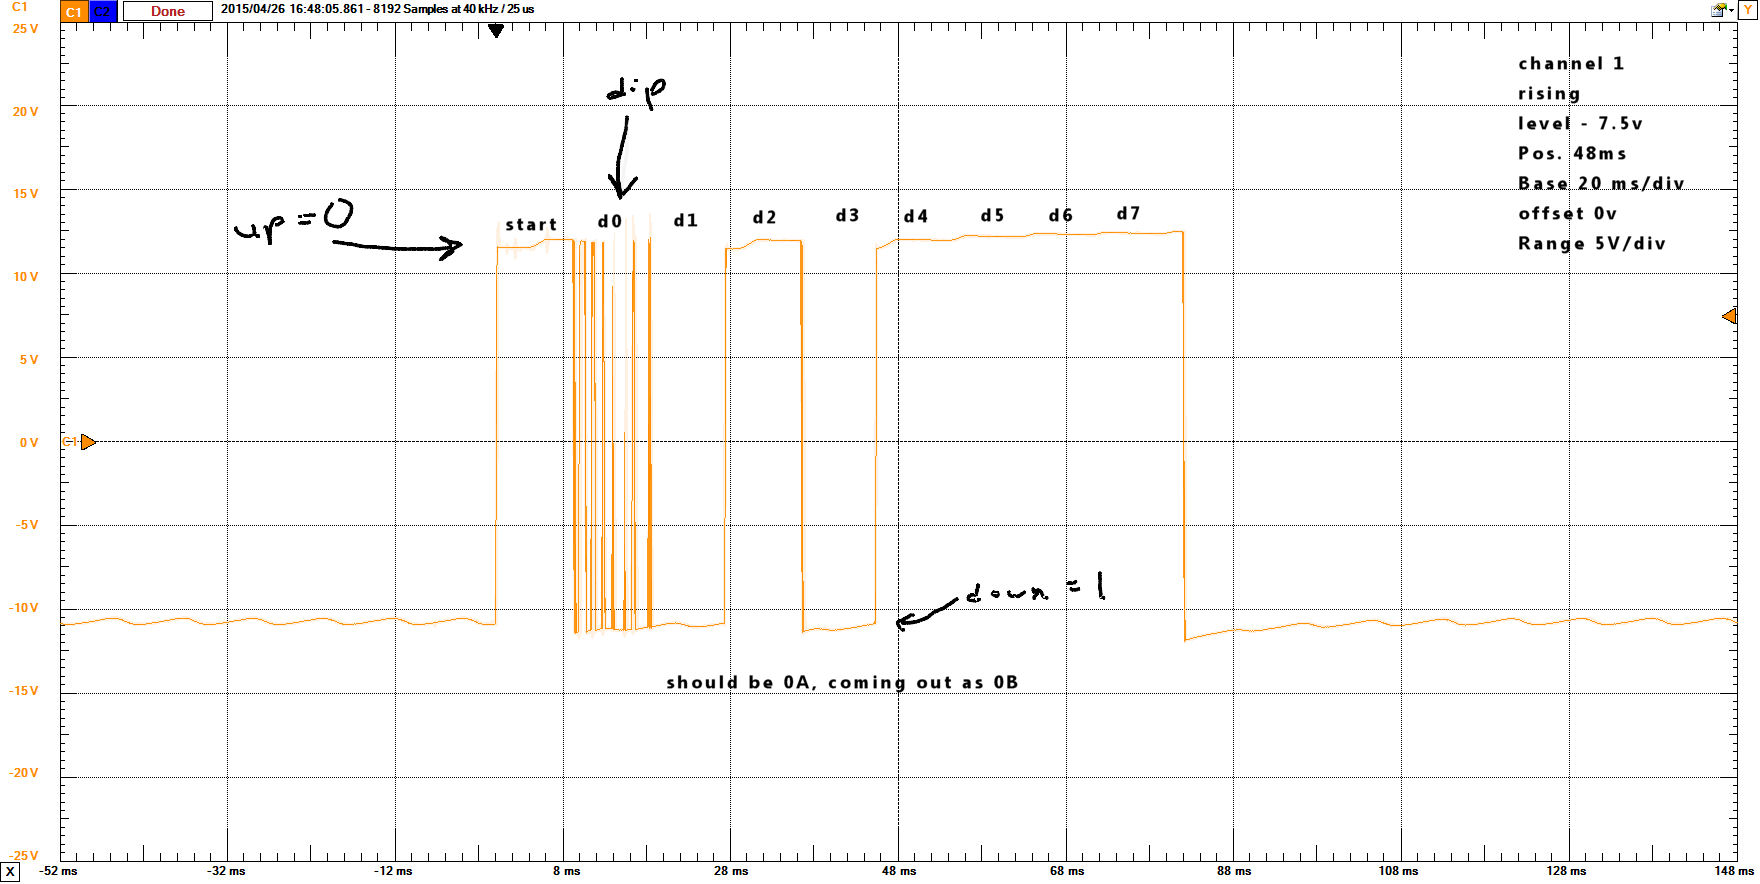
One final comment about the RS232 converter...They're nice when you want to troubleshoot problems because the signals are easier to use with an oscilloscope than current loop.
Take a look at this oscilloscope output for an example. Attach RS232 output pins 2&3 to positive, pin 7 to the return. Type a key on the keyboard (or advance the reader) while the Teletype is in LINE mode. With 2 and 3 connected on the RS232 end, you'll get the characters echoed back to the Teletype printer AND the signal will appear on your oscilloscope. The above linked photo has settings you can try. Reply |
|
|
Repairs |
by Bill Degnan - 05/07/2015 16:37 |
|
I sent the reader out for repairs. I took this as far as I could but in the end there are times when you have to get help. I am quite thankful for Wayne Durkee's assistance.
Reply |
|
Resources:

Popular Topics and FAQs
Past Issues:
Before we switched over to a blog format, past page archives here:
Vintage Computer Festival East 3.0 June 2006
Commodore B Series Prototypes July 2006
VOLSCAN - The first desktop computer with a GUI? Oct 2006
ROBOTS! - Will Robots Take Over? Nov 2006
Magnavox Mystery - a Computer, or? Jan 2007
The 1973 Williams Paddle Ball Arcade Computer Game Feb 2007
The Sperry UNIVAC 1219 Military Computer May 2007
VCF East 2007 - PET 30th Anniversary June/July 2007
The Electronic Brain August 2007
Community Memory and The People's Computer Company October 2007
Charles Babbage's Calculating Machine December 2007
Vintage Computing - A 1983 Perspective February 2008
Laptops and Portables May 2008
From Giant Brains to Hobby Computers - 1957 to 1977 August 2008
Historic Computer Magazines November 2008
World's Smallest Electronic Brain - Simon (1950) December 2008 - Feb 2009
Free Program Listings Spring 2009
Computer Music Summer 2009
Popular Electronics Jan/Feb 1975 - Altair 8800 Fall 2009
Early Microcomputer Mass Storage Summer 2010
DEXTIR 1961 ESSO
This image was selected at random from the archive. Click image for more photos and files from this set.